Master the art of slicing corned beef to perfection with this simple, foolproof method. Whether you’re making a classic Reuben sandwich or adding corned beef to your favorite hash, cutting it properly is essential for mouthwatering tenderness and flavor. Let me guide you through the process, and you’ll soon be slicing corned beef like a seasoned pro!
When cutting corned beef, first let it rest for about 10 minutes after cooking to retain its juices. Place the cooked corned beef on a cutting board and identify the grain direction, which is the alignment of the muscle fibers in the meat. Using a sharp carving knife, slice the meat against the grain into thin, even slices. This ensures tenderness and makes it easier to chew, perfect for serving with traditional Irish dishes like colcannon or for layering in a Reuben sandwich.
The origins of corned beef
Corned beef traces its origins back to various ancient civilizations, but the modern version we know today is largely a product of Irish and British culinary traditions. The term “corned” refers to the process of preserving meat by curing it in a mixture of salt and other ingredients, often including nitrates and nitrites. The word “corn” in this context comes from the Old English word for a small, hard particle or grain, which describes the coarse salt granules traditionally used in the curing process.
In ancient times, meat preservation was essential for survival, as it allowed people to store food for long periods without refrigeration. The Egyptians, Greeks, and Romans all had their own methods of preserving meat, including salting and smoking. Corned beef, as we understand it today, likely evolved from these early preservation techniques.
During the Middle Ages, corned beef became more popular in Europe, especially in Britain and Ireland. The British Isles had a long history of cattle farming, and preserving beef through corning was a practical way to extend the shelf life of the meat. It was often used as a staple food for sailors and traders, who needed provisions that would last during long sea voyages.
In the 17th and 18th centuries, the Irish became particularly skilled at producing corned beef, thanks to their abundant salt marshes, which provided high-quality salt for the curing process. The Irish exported large quantities of corned beef to England and the British colonies, including America. It was during this time that corned beef became associated with the Irish, despite it not being a common dish in Ireland itself.
When Irish immigrants arrived in America during the 19th century, they found that beef was more affordable than pork, which was the traditional meat used for curing in their homeland. As a result, Irish Americans began to make corned beef using the cheaper and more readily available beef, and it eventually became a symbol of Irish-American culture.
Today, corned beef is enjoyed worldwide and is often associated with St. Patrick’s Day in the United States. The dish is typically served with cabbage, potatoes, and other vegetables, making it a hearty and flavorful meal.
Preparing corned beef at home
To prep corned beef before cooking, follow these steps:
- Thaw the beef: If the corned beef is frozen, place it in the refrigerator to thaw gradually for 24-48 hours, depending on the size. Gradual thawing in the refrigerator ensures that the corned beef maintains its texture, quality, and safety. A slow thaw helps prevent bacterial growth and uneven cooking.
- Inspect the meat: Examine the corned beef for any visible damage or discoloration. The meat should have a consistent pinkish-red hue. Checking the meat for damage or discoloration is essential for food safety and quality assurance. Consistent coloration indicates proper curing and freshness.
- Remove packaging: Take the corned beef out of its packaging, and discard any included spices or flavoring packets, as they can be overly salty. Discarding the packaging and included spices or flavoring packets helps control the salt content, allowing you to season the dish according to your preferences.
- Rinse the beef: Wash the corned beef under cold running water to remove surface brine and excess salt. This step helps balance the overall saltiness of the dish. Washing the corned beef under cold running water removes surface brine and excess salt. This step reduces the overall saltiness, ensuring a balanced flavor profile.
- Pat dry: Use paper towels to gently pat the corned beef dry, removing excess moisture from the surface. Drying the surface of the corned beef with paper towels removes excess moisture, which can interfere with the cooking process and lead to uneven browning or steaming.
- Trim excess fat: If the fat layer on the corned beef is too thick, trim it down to approximately 1/4 inch. Retaining some fat is essential for keeping the meat moist and flavorful during cooking. Trimming the fat layer down to approximately 1/4 inch provides enough insulation to keep the meat moist during cooking, while also preventing an overly greasy or fatty final product.
By properly prepping your corned beef before cooking, you ensure a flavorful and tender result. Thawing, inspecting, rinsing, drying, and trimming the meat are crucial steps to achieve the best possible outcome.
Pro tips:
Here are some pro tips to enhance your corned beef cooking experience and achieve the best possible results:
- Soak the beef: If your corned beef is particularly salty, you can soak it in cold water for a few hours or overnight in the refrigerator, changing the water every 30 minutes to an hour. This will help to draw out even more salt from the meat.
- Choose the right cut: Corned beef is typically made from two different cuts – the flat cut and the point cut. The flat cut is leaner and more uniform in shape, making it easier to slice and ideal for presentation. The point cut has more marbling and fat, which can result in a more tender and flavorful final product.
- Spice it up: Customize your corned beef by adding your own blend of spices and herbs during the cooking process. Popular choices include bay leaves, peppercorns, allspice, cloves, and mustard seeds.
- Cook with aromatics: To further enhance the flavor of your corned beef, consider adding aromatics such as onions, garlic, and celery to the cooking liquid.
- Low and slow: Regardless of the cooking method you choose, be it simmering or oven-baking, always cook your corned beef at a low temperature for a longer time. This gentle cooking process helps to break down the tough connective tissue, resulting in tender and juicy meat.
- Glaze for extra flavor: After cooking and before resting, brush your corned beef with a glaze made from mustard, brown sugar, and a splash of the cooking liquid. This will create a caramelized, flavorful crust on the surface of the meat.
- Slice against the grain: For tender, easy-to-chew slices, always cut your corned beef against the grain. This shortens the muscle fibers, improving the overall texture of the meat.
Cooking Guidelines
To achieve tender, juicy, and flavorful corned beef brisket, it’s essential to follow proper cooking guidelines. Here are some key recommendations for cooking your corned beef to perfection:
- Monitor the internal temperature: When simmering the corned beef brisket whole, ensure that the internal temperature reaches at least 165 F. This temperature helps to melt the collagen inside the meat, resulting in tender and juicy beef. Use a meat thermometer to accurately measure the temperature.
- Simmering method: If cooking the corned beef in a pot, allow it to simmer for approximately 3 hours or 30 minutes per pound of meat. This slow and gentle cooking process helps to break down the tough fibers and retain moisture.
- Oven-baking method: Alternatively, you can bake the corned beef in the oven at 350 F for about 2 and a half hours. To achieve the best results, make sure the internal temperature reaches 195 F before removing the meat from the oven.
- Prepare the baking setup: Place the corned beef on a tray or grid set inside a baking tray, allowing the juices to collect at the bottom. These juices can be used to make a delicious gravy to accompany your meal.
- Season the beef: Enhance the flavor of your corned beef by basting it with mustard or adding your favorite seasonings before cooking.
- Cook the brisket whole: To retain moisture and ensure the most succulent results, cook the brisket in one large piece. Avoid cutting it into smaller portions before cooking, and keep the fat layer intact to preserve juiciness.
- Rest the meat: After cooking, remove the corned beef from the heat and cooking liquid, and transfer it to a clean chopping board. Cover the meat with aluminum foil and allow it to rest for 15 minutes. This step helps the beef reabsorb any released juices and firm up slightly, resulting in a better texture and flavor.
Trimming your cooked corned beef
Trimming the excess fat from your cooked corned beef is an important step for both presentation and taste. Here’s how to properly trim your cooked corned beef:
- Let the corned beef rest: After cooking, allow the corned beef to rest for about 10-15 minutes on a cutting board or platter. Resting the meat helps it to reabsorb its juices and makes it easier to handle when trimming.
- Identify the fat: Examine the corned beef and locate the layer of fat, which may be on one side or distributed in various spots throughout the meat. The fat will typically appear as a glossy, white, and sometimes slightly translucent layer.
- Use a sharp knife: A sharp knife is essential for trimming the fat efficiently and cleanly. A boning knife or a carving knife is ideal, but a chef’s knife will also work. If needed, sharpen your knife before starting.
- Use a meat fork for stability: Hold the corned beef steady with a meat fork or your non-dominant hand. The meat fork provides better stability and control while trimming, reducing the risk of accidents.
- Trim the fat: Gently slide the knife under the layer of fat, keeping the blade angled slightly upward to avoid cutting into the meat. Carefully trim away the fat, working in small sections and using smooth, controlled strokes. Be sure to remove only the excess fat and not the meat itself.
- Discard the trimmed fat: Place the removed fat in a separate container or directly in the trash. Avoid letting the trimmed fat accumulate on your cutting board, as this can create a slippery surface and make it difficult to continue trimming.
- Slice and serve: Once you’ve finished trimming the excess fat from the corned beef, use the meat fork to hold the meat in place while you slice and serve it according to your preferred method.
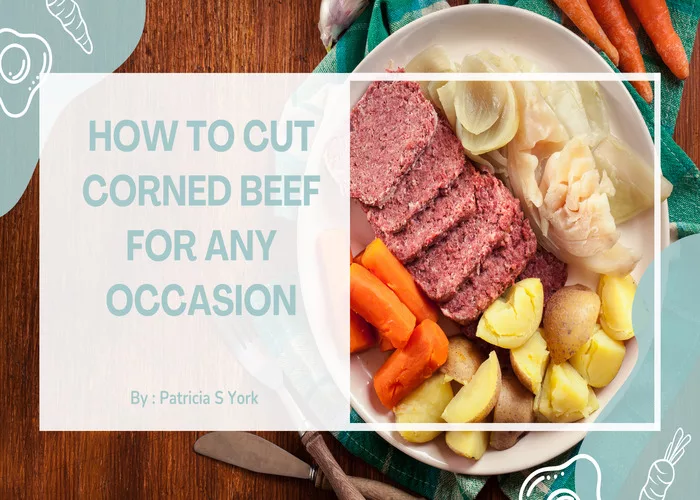
Slicing your corned beef
Follow these steps to ensure you’re slicing your corned beef correctly:
- Allow the corned beef to rest: After cooking, let the corned beef rest for about 10-15 minutes on a cutting board or platter. Resting the meat helps it to reabsorb its juices and makes it easier to handle when trimming and slicing.
- Identify the fat and grain: Examine the corned beef to locate the layer of fat and determine the direction of the grain. The grain refers to the alignment of the muscle fibers and appears as parallel lines running through the meat.
- Use a sharp knife and a meat fork: A sharp knife, such as a boning, carving, or chef’s knife, is essential for trimming the fat and slicing the meat efficiently. A meat fork will help you hold the corned beef steady while trimming and slicing. If needed, sharpen your knife before starting.
- Trim the fat: Hold the corned beef steady with the meat fork, piercing it on the side opposite the layer of fat. Gently slide the knife under the fat, keeping the blade angled slightly upward to avoid cutting into the meat. Carefully trim away the fat, working in small sections and using smooth, controlled strokes.
- Discard the trimmed fat: Place the removed fat in a separate container or directly in the trash. Avoid letting the trimmed fat accumulate on your cutting board, as this can create a slippery surface and make it difficult to continue trimming and slicing.
- Slice the corned beef: With the fat trimmed, pierce the corned beef again with the meat fork to hold it in place. Hold the knife perpendicular to the grain and make thin slices (approximately 1/8 to 1/4 inch thick) by cutting across the grain, not parallel to it. Slicing against the grain shortens the muscle fibers, resulting in more tender and easier-to-chew slices.
- Serve immediately: Once you’ve trimmed the excess fat and sliced the corned beef using the meat fork for stability, serve it promptly to ensure the best flavor and texture.
Corned beef recipes
Explore these delicious ideas for incorporating corned beef into your meals:
- Corned Beef Sandwich: Pile thinly sliced corned beef on rye or sourdough bread, add Swiss cheese, sauerkraut, and Thousand Island dressing for a delicious Reuben sandwich.
- Corned Beef Hash: Dice cooked corned beef, potatoes, and onions, then fry them together in a skillet until crispy. Top with a fried or poached egg for a hearty breakfast or brunch dish.
- Corned Beef and Cabbage Soup: Combine shredded corned beef with chopped cabbage, carrots, onions, and potatoes in a broth. Season with herbs and spices for a warming, comforting soup.
- Corned Beef Tacos: Use corned beef as a unique filling for tacos, along with shredded cabbage or coleslaw, sliced avocado, and a zesty dressing or salsa.
- Corned Beef and Potato Gratin: Layer thinly sliced corned beef with sliced potatoes, onions, and cheese in a casserole dish. Pour over a cream sauce and bake until golden and bubbly.
- Corned Beef Fried Rice: Stir-fry cooked rice with diced corned beef, mixed vegetables, soy sauce, and a scrambled egg for a tasty twist on a classic Asian dish.
- Corned Beef and Cheese Sliders: Place sliced corned beef and cheese on small rolls or slider buns. Add pickles, mustard, or other preferred condiments, and serve as appetizers or snacks.
- Corned Beef Stuffed Peppers: Stuff bell peppers with a mixture of cooked rice, chopped corned beef, diced tomatoes, and seasonings. Bake until the peppers are tender and the filling is heated through.
- Corned Beef and Cabbage Salad: Create a refreshing salad by tossing together shredded cabbage, chopped corned beef, carrots, and onions. Add a tangy dressing and serve as a light meal or side dish.
- Corned Beef and Potato Cakes: Mix mashed potatoes, chopped corned beef, and seasonings, then form into patties. Pan-fry until crispy and golden on the outside. Serve with sour cream or applesauce for dipping.
Corned beef FAQs
How long can you store corned beef in the fridge before cooking?
Corned beef can typically be stored in the refrigerator for 5 to 7 days before cooking. It is important to keep the corned beef well-wrapped or in an airtight container to prevent cross-contamination with other foods and to maintain its freshness. If you are unsure if the corned beef is still safe to eat, look for signs of spoilage such as a foul odor or slimy texture. It is always better to err on the side of caution and discard any corned beef that appears or smells spoilage. After cooking, corned beef can be stored in the refrigerator for 3 to 4 days. To extend the shelf life, you can also freeze cooked corned beef for up to 2 to 3 months.
What dietary restrictions should I be aware of if serving corned beef to guests?
What dietary restrictions should I be aware of if serving corned beef to guests?
When serving corned beef, it is important to consider dietary restrictions of your guests, such as gluten-free, low-sodium, kosher or halal, and vegetarian or vegan diets. Corned beef often contains barley and is high in sodium, making it not suitable for gluten-free or low-sodium diets. It is also not suitable for those who follow strict kosher or halal diets, as well as vegetarians or vegans. Checking the label or recipe for gluten-free options and considering the dietary restrictions of your guests can ensure that everyone is able to enjoy the meal and feel included.
What do I do with leftover corned beef?
Leftover corned beef can be used as a filling for sandwiches, added to casseroles, soups and stews, incorporated into omelets, or added to fried rice. To store leftover corned beef, it can be kept in the refrigerator for 3 to 4 days or in the freezer for 2 to 3 months. When reheating, it is important to ensure it reaches a safe temperature of 165°F to avoid foodborne illness.